Quest-Based Learning or QBL is one aspect of Gamification. As you read this post you might wonder, “do I need to gamify my course or use technology to offer choices, multiple pathways, or differentiate?” The answer to that would be a resounding no! Nothing here is new but added to a gamified classroom, the strategies shown here can make your course more exciting to students. That’s what motivated me to delve into the world of gamification, looking for ways to make my courses more engaging to all my students especially those are just not that into what is covered in my class. For more ideas on how to gamify a course, look here.
Self-Directed Learning
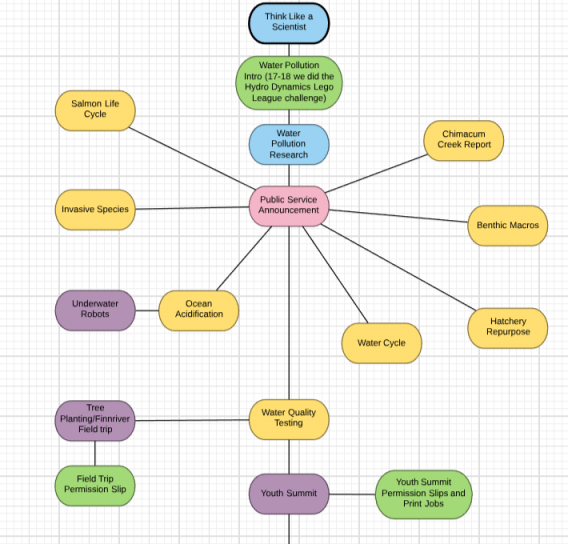
A good way to implement QBL is to structure your assignments in such a way that gives students choices. QBL not only should give students choices but also multiple pathways to learn and show mastery of our content and skills. (I tend to value the skills my students are learning/practicing a bit more than my content because long after they forget the content they learned in my classroom they will still be using many of the skills.) In my gamification journey I have taken my different curricula and mapped them out into quests that branch in the order I need students to learn the different concepts and skills. The image below is a snapshot of one such plan I created on Lucidchart. Mapping it out first is essential before launching a gamified QBL course so that I don’t get lost as I organize all the different assignments, tasks, assessments, labs, etc.
Branching Quests
If you are mapping out a curriculum that you developed, you might have multiple pathways for students already. I found that my curriculum did not have many alternate assignments for individual concepts, therefore not much in the way of multiple pathways for learning built-in. I usually differentiate on an as needed basis. When students begin to struggle with certain assignments, tasks, labs, or projects that is when I step in to either re-teach or offer accommodations, so I don’t have anything developed until I need it and create it on the spot. If I don’t use it year after year then I might just forget I ever created it!
I also noticed that some of my curriculum followed a very linear path not allowing much freedom for different ways to learn the content. I do have some curriculum that lends itself more to choice so that is where I included more branching out, but often the choices were between assignments covering different topics. Consider that when you offer choice to your students, they need to be able to work on their own, at their own pace, because not all of our students will complete tasks at the same time. In a blended classroom there is room for face-to-face learning, whole class learning, cooperative team learning, and individual learning facilitated by technology, so that is the best model for a QBL in my opinion. (Blended Learning is a mixture of online learning and more traditional face-to-face learning to provide students choice and voice in their learning.)
Here’s what quests look like in the Classcraft Learning Management System (LMS) that I use to gamify my courses:
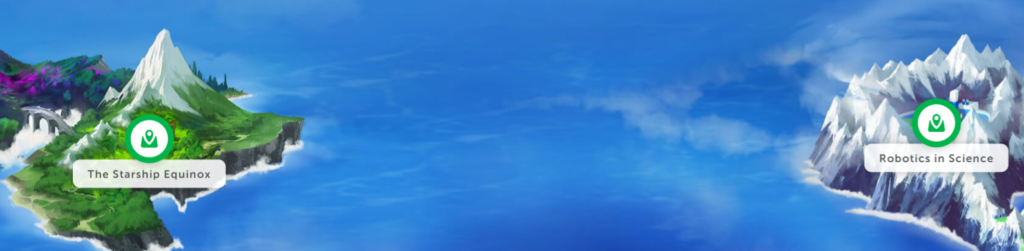
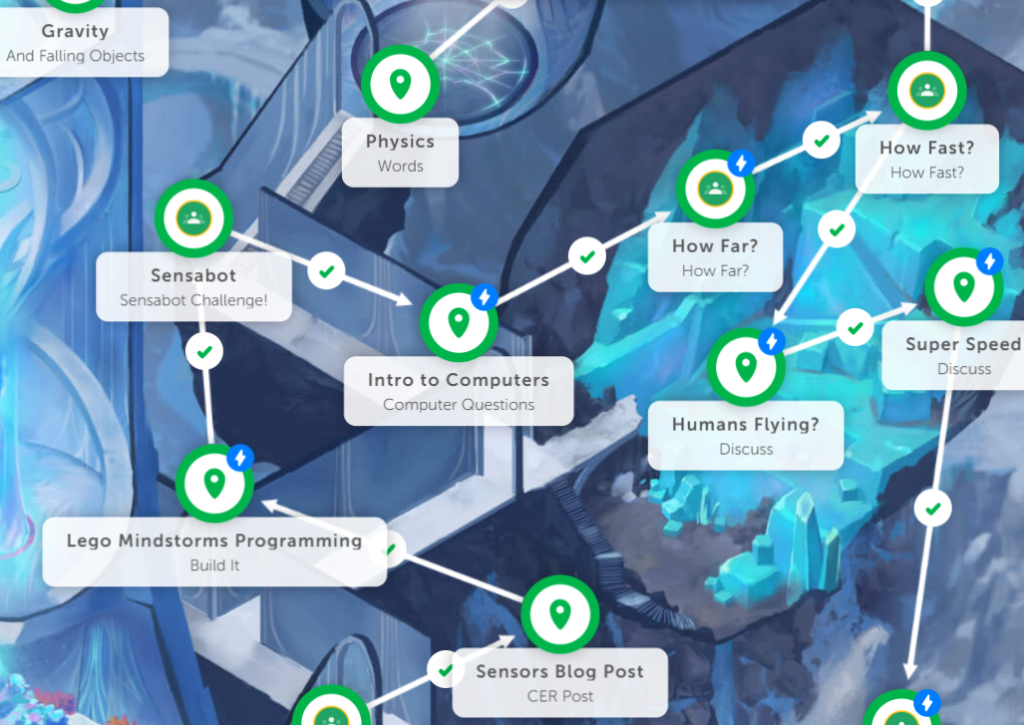
You see two separate quests, The Starship Equinox and Robotics in Science. Each one has all sorts of different assignments within. When a student clicks on a quest circle, that students only sees the quest introduction at first. As students complete assignments they unlock the next assignments in the order they were mapped out by the teacher. So while you as the teacher will see all your assignments mapped out as in the image below, students do not see that. It would be overwhelming for most and many would be clicking around on assignments they won’t be able to start yet. If you have it set up, completing an assignment can unlock more than one new assignment to give students choice as to what they will do next. Therein lies the magic.
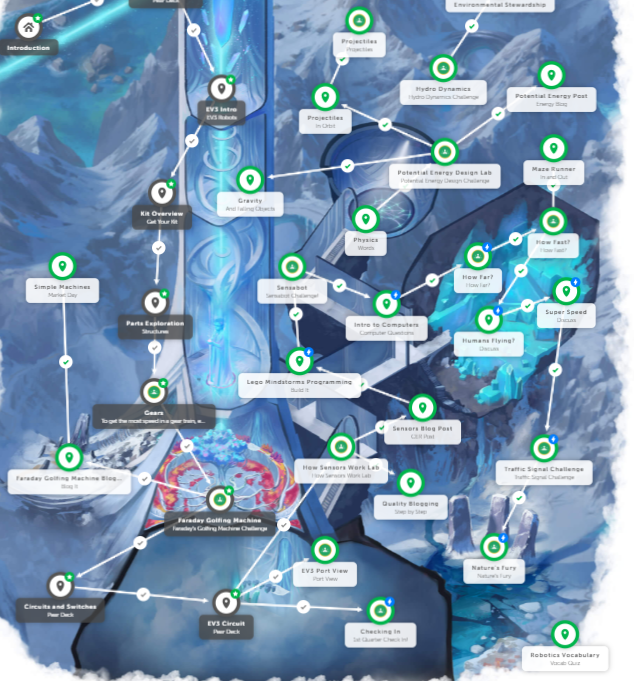
In the image above I took my Lucidchart mind-mapped course plan and created the quest objectives pictured.
—
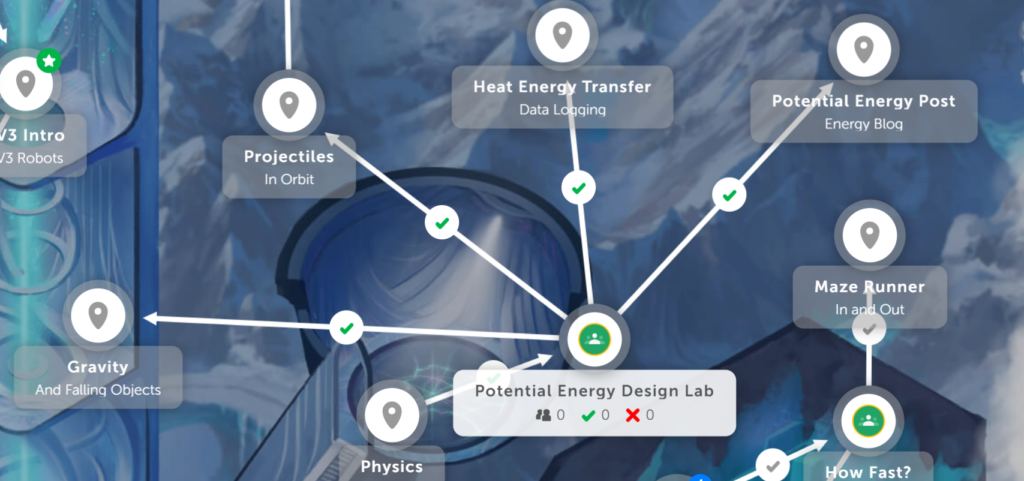
Zooming in closer on the map of assignments one can see that once students successfully complete the Potential Energy Design Lab they unlock the Gravity, Projectiles, Heat Energy Transfer, and Potential Energy Post assignments. At this point I will have teams finishing before the rest of their classmates. Instead of having them do busy work or having them wait for the rest of their classmates, as teams complete their lab and I approve all their work, each person on the team can work on a different follow-up assignment! It’s quite brilliant and has made my life so much easier to have students always working on assignments and not needing busy work from me. They just choose an assignment and click on it to move on.
Choice – Done. Multiple Pathways??
I am using the STEM Robotics 101 curriculum in 6th grade Science, a free curriculum for use with the Lego Mindstorms EV3 kits (which are pricey), and much of the curriculum is linear as new skills build on prior skills. The curriculum does gives me the freedom to adapt it to my students’ needs as I see fit, so I have branching assignments that give students choice of what to work on next sprinkled throughout. What I would love for my quests to do is to help me differentiate between what comes next based on how students do on an assignment or task. Classcraft has a vehicle for that but I have not developed assignments to take advantage of it. More on that at the end of this post (with links for more info on QBL).
Before I show the way Classcraft allows for multiple pathways and differentiation, let me show how teachers add their assignments to the Classcraft Learning Management System.
Here’s what it takes to design a Classcraft quest and assignments: When you first create a quest you place it on the startup map and begin your unit with an introduction. This is meant to launch your classroom narrative and can be used to totally immerse your students in a grand adventure. Or it could be the intro to your course, like a syllabus. I’ve done both. I started by introducing my course but each year I have added more story elements.
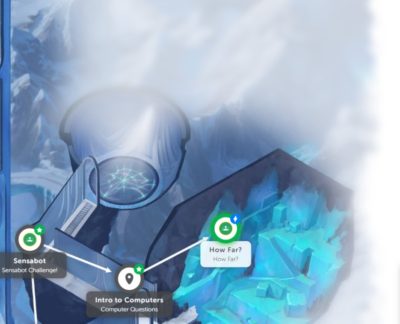
Once in a quest you get to choose from a selection of maps. The entire map does not appear to students, it’s all in a deep mist as in the above image. They only see the area surrounding the assignments they’ve completed so it adds appeal to unlocking new assignments since that’s the only way they’ll see the entire map.
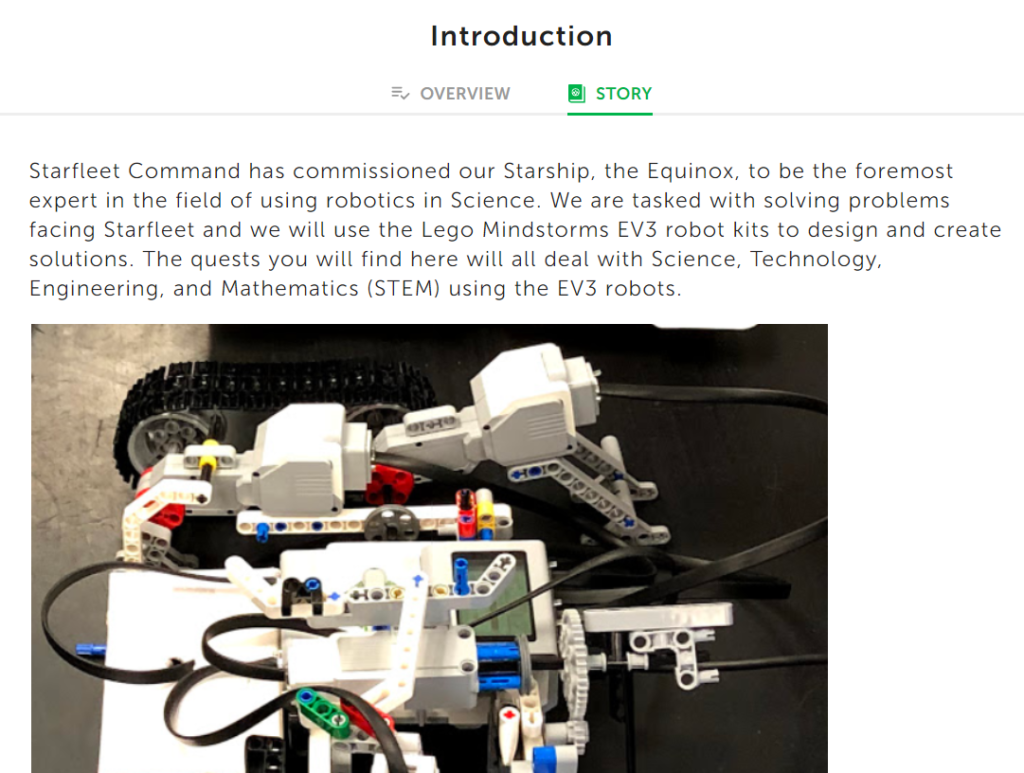
Here’s my current STEM Robotics 101 intro that students see when they first click on the Robotics in Science quest:
Once students read the introduction they click on a Task Complete button to launch their first activity. You as the teacher can make the activity individual, whole class, or team project. It all depends on what students would normally do in your class at that time.
Sample Quest Objective
Following the quest introduction could be an activity like the one shown below. As the teacher, adding another assignment gives you choices as to how to deliver the lesson or activity to your students. In other words, you are in complete control of what the students are asked to do in your Classcraft quest objectives. The quest objectives or assignments are totally blank slates when you create new ones.
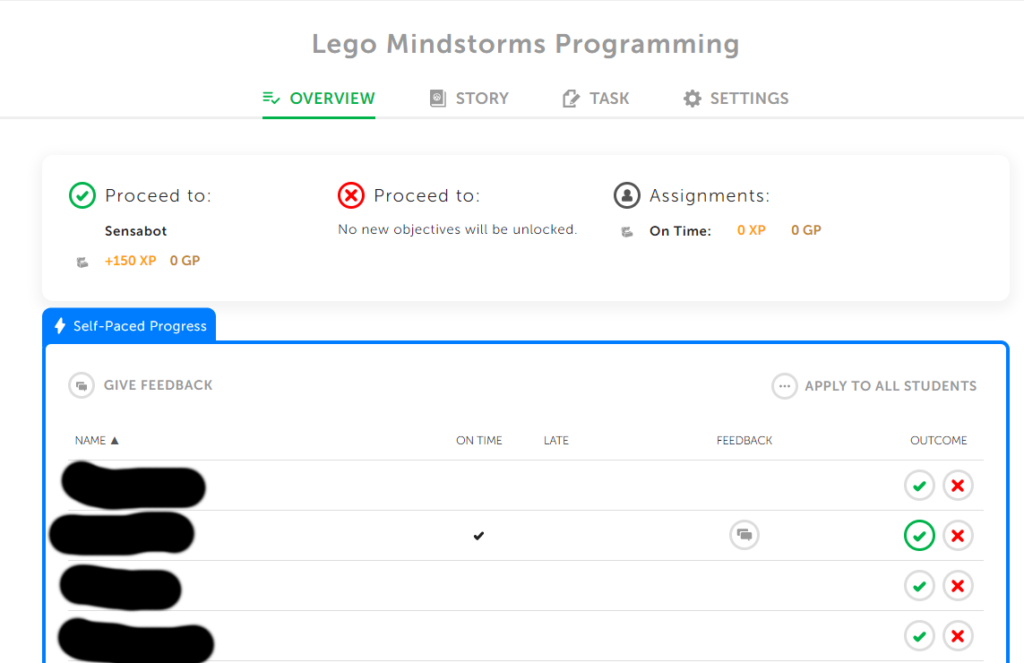
The overview above shows assignment details as well as students who have unlocked the assignment. In the settings you can make an assignment self-paced so that when a student completes it the next assignment(s) are automatically unlocked. If you turn off self-paced mode then you have to check the student’s work and approve each student’s work yourself before they unlock or see the next assignment(s). I usually mark assignments that are easy, self-paced so that students don’t have to wait for me to move on to the next assignment. Sometimes I even mark an assignment that requires me to check for accuracy or completeness as self-paced because I can always come back later and give the student feedback to help him or her make it better. It’s all a matter of flow and some assignments I do not select self-paced because it’s essential they get it right before moving on. And if you populate your quest with more assignments than any student can complete, then your fast kids will ALWAYS have something to work on! Remember, you don’t have to grade everything and students should not have to complete everything you assign in a quest to successfully complete and pass your class.
Once students start completing and submitting assignments, I can read or check their work and approve or return their work. In the above example, I approved one student’s Lego Mindstorms Programming work as shown by the green check mark being selected.
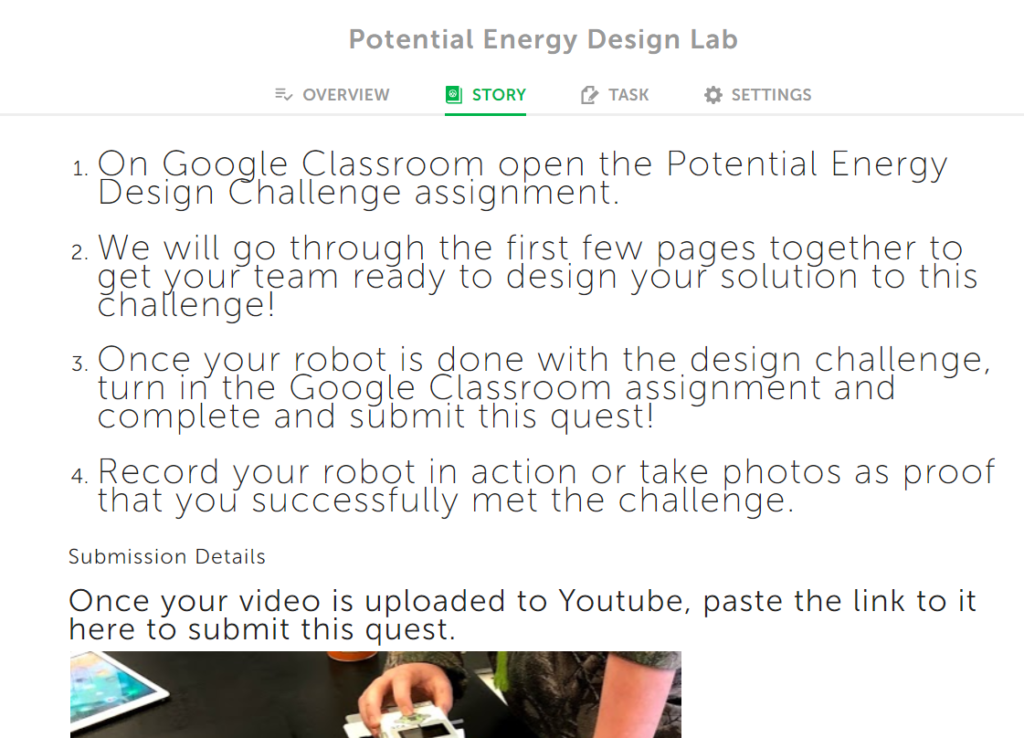
The assignment story is where your ongoing class narrative will continue (if you started one in your quest introduction). On some assignments I keep my Star Trek theme story going but most of the assignments I have look like the example above. It’s a set of instructions telling students what they need to do.
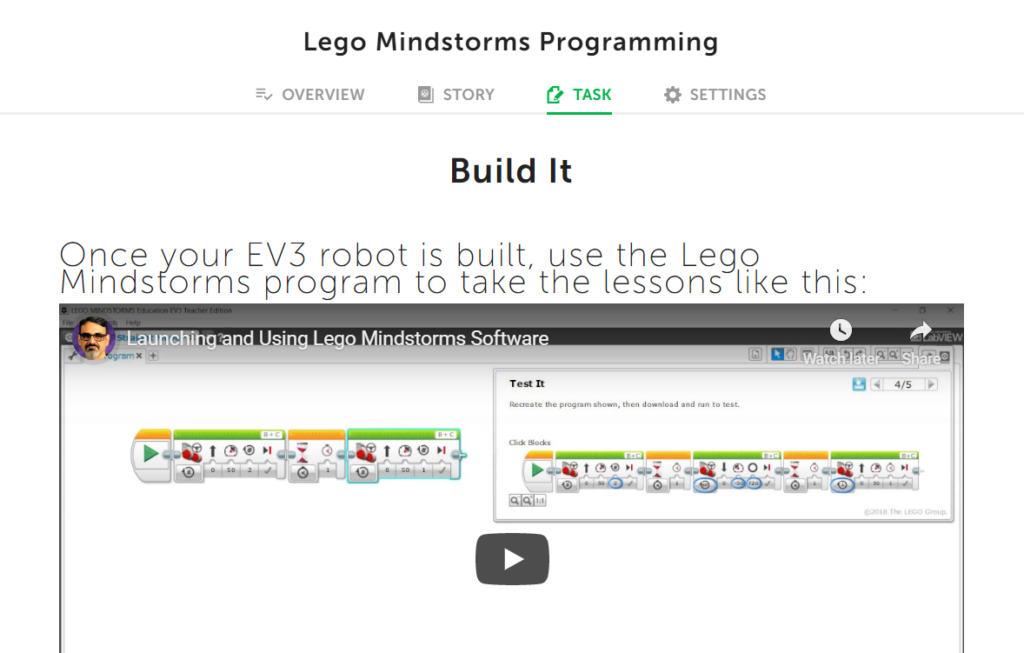
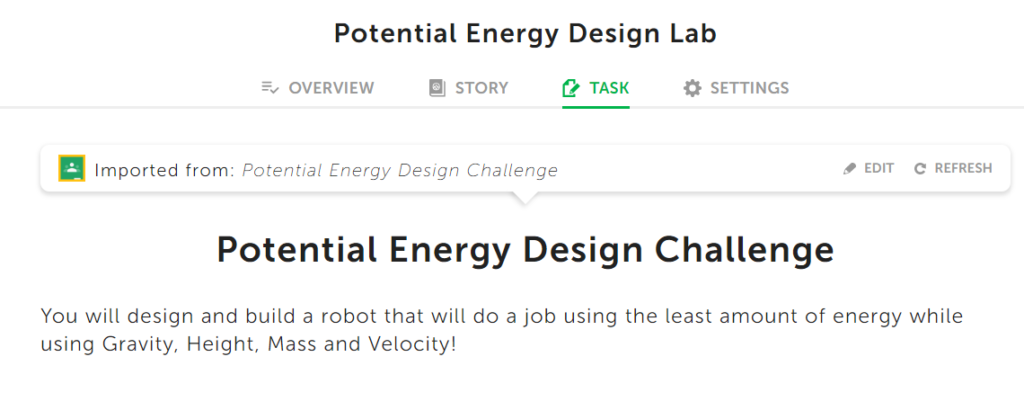
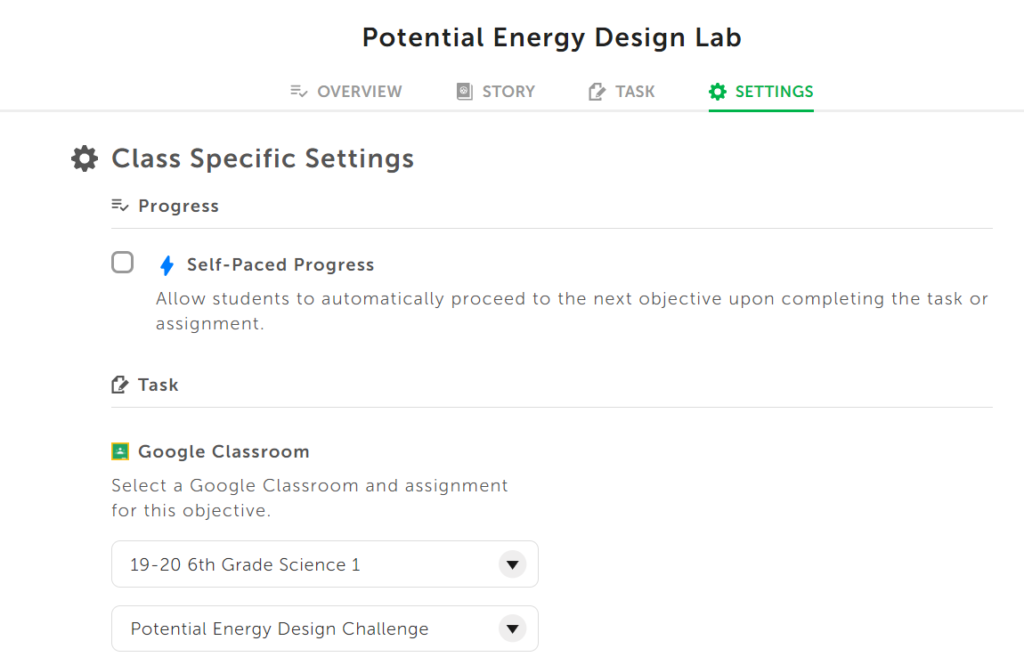
The task is where the teacher gives directions for what the students are to do as in the example above, so if you have a story in the story section, this is where you’ll have the actual instructions. I have two sets of instructions because I wanted to break my steps into smaller chunks and I didn’t have a story, nor time to develop one. You can also import assignments from Google Classroom as shown below.
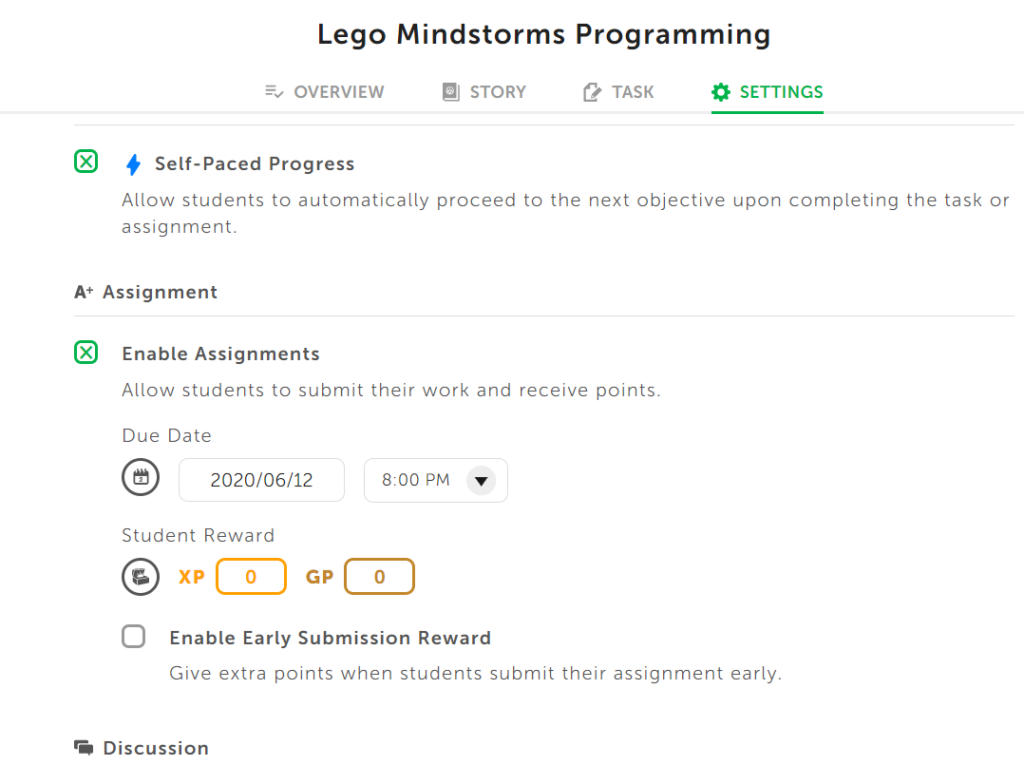
The settings tab is where you set whether students can proceed self-paced or not, among other things. Above I used the assignment feature and below are the settings when a Google Classroom assignment is imported to Classcraft.
So as I design an entire quest (usually a single unit) I can give students choices as in my earlier screenshot with multiple branches coming off the Potential Energy Design Design Lab assignment or I can make them proceed in a linear fashion as I did below with assignments that need to be done in order.
The paths you see between assignments don’t happen automatically. When assignments are created by the teacher, the teacher can drag them anywhere on the map. Then the teacher selects a different tool to draw the lines putting the assignments into an order (this is where my Lucidchart mind-map plan was extremely helpful!). When you draw the paths between assignments you get some choices as shown below:
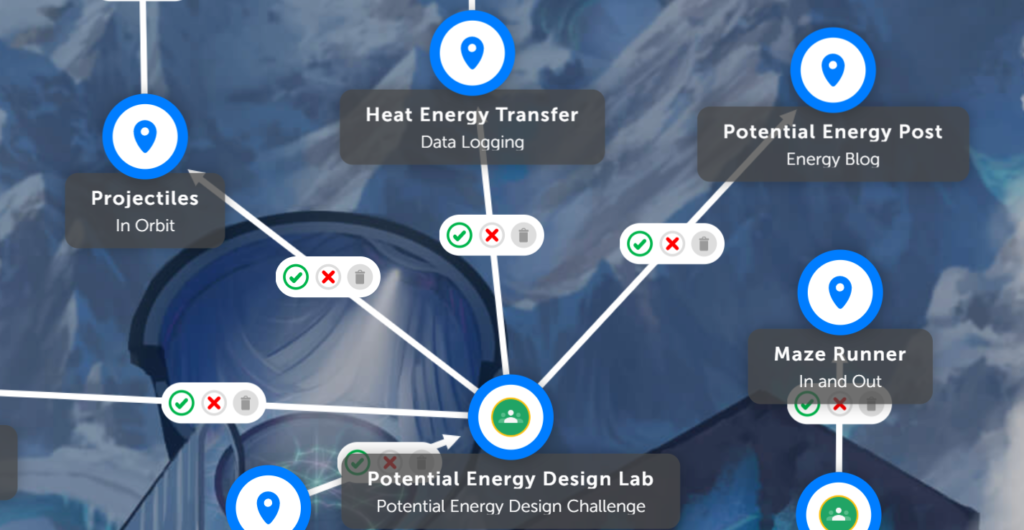
The trash can makes it so that you can delete a path you no longer want (and that hides assignments from kids in case it’s an assignment that either isn’t ready or I don’t want the kids to see yet – I often have to hide assignments from my fast kids because they start to unlock assignments I’m not ready for them to work on!). I can also select the check mark so that if I choose the check mark for one student who successfully completed the assignment when I’m grading their work, the student moves on to the next, more challenging assignment (or just the next assignment in the series). Self-paced mode assumes the student completed the assignment successfully, therefore is the same as when the teacher selects the green check mark. The red X is Classcraft’s cool feature that allows differentiation right in your quests!
By selecting the red X in the image above, I make it so that if I click on the red X instead of the green check mark in the Overview section of an assignment when I’m grading their work, that sends students to different quests. Green checks are for those who successfully complete assignment or show understanding/mastery and therefore ready to move on to the next task. Red X’s are for those who need re-teaching or reinforcement of some kind. That way I can make follow up assignments that reinforce a skill or concept not yet mastered!
That is a feature I’ve been wanting to use but haven’t had the time! If I could add some assignments that reinforce concepts in my quests, then I can give students other opportunities to learn and show understanding or even mastery. Currently, I re-teach whole class if everyone can benefit, give specific feedback to the few who need it and send back the assignment until they finish it satisfactorily, or provide small group instruction when there are more than a few who aren’t getting it. All good and valid strategies but I would like to have another tool in my belt, especially for those students who struggle too much with the original assignment. Alternative assignments that maybe even reinforce earlier skills or content would be beneficial and can be done in class while I’m working with other students. I’m looking for something that allows for a good flow in the classroom.
So that’s my next project for my gamified, Classcraft, Science units: to add follow-up assignments for students who struggle and could use some review work!
What do you think? Do you do something similar to this? Please share in the comment section below.
Here are some QBL resources:
Understanding Quest-Based Learning
Quest-Based Learning: Changing the game of education through learner choice.
Using Quests in Project-Based Learning
Al Gonzalez – official Classcraft Ambassador